
Trip Report: Rock Climbing in Squamish, British Columbia
When: 8/07/2018
Location: Climbing in Squamish, British Columbia
Conditions:
Hot but not unbearable, hot enough that we had to chase the shade, which isn't too hard in Squamish. On our last day it started to drizzle but that was the only precipitation we experienced. No serious winds or other undesirable weather occurrences.
Duration: 5 days, 4 nights
Difficulty:
Climbing: grades 5.6-5.11c. All were definitely a bit steep for the grade but that should be expected for granite crack and slab.
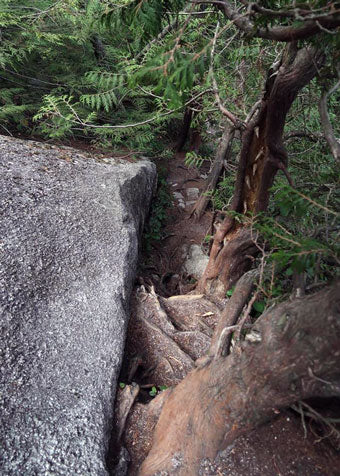
Approaches/Downclimbs: Some were on the steeper side, necessitating vertical climbing with the use of fixed ropes. I would highly recommend bringing approach shoes.
Kid Friendly: No (unless you've got some hardcore climber kids)
Pet Friendly: Yes, dogs must be on leash at all times
Usefull links:
www.mountainproject.com | www.thecrag.com
 The Full Report:
Squamish is a world-renowned destination for climbing, people come from all over the world to witness Swatamus Cheif and scale the many climbing routes up and around it. My partner and I are no different and followed the crowd taking a 6-hour drive up to Squamish to spend five days climbing and highlining while camping at Swatamus Cheif Campground. The drive itself is full of pit stops and beautiful scenery, from views of Puget Sound to the mountains of northern Washington, it feels like a quick 6 hours. The border crossing, which can be done with a passport or a passport card, can take anywhere between 10 minutes and an hour. Account for this delay in your journey. After getting through the border in around 45 mins, we drove through Vancouver, BC, and made our way up to Squamish, 1 hr. from Vancouver and roughly 1 hr. and 45 mins from the border.
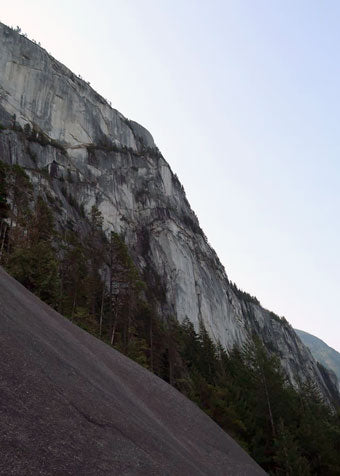
Right before reaching Squamish we were greeted by Swatamus Cheif, also referred to as The Cheif, a beautiful mass of rock overlooking the small city. We pulled into the campground where we were quickly greeted by other climbers and highliners, strangers and friends alike. We found a parking spot, filled out the self-service forms and slipped out $10 per night per person fee to a locked box.
The Full Report:
Squamish is a world-renowned destination for climbing, people come from all over the world to witness Swatamus Cheif and scale the many climbing routes up and around it. My partner and I are no different and followed the crowd taking a 6-hour drive up to Squamish to spend five days climbing and highlining while camping at Swatamus Cheif Campground. The drive itself is full of pit stops and beautiful scenery, from views of Puget Sound to the mountains of northern Washington, it feels like a quick 6 hours. The border crossing, which can be done with a passport or a passport card, can take anywhere between 10 minutes and an hour. Account for this delay in your journey. After getting through the border in around 45 mins, we drove through Vancouver, BC, and made our way up to Squamish, 1 hr. from Vancouver and roughly 1 hr. and 45 mins from the border.
Right before reaching Squamish we were greeted by Swatamus Cheif, also referred to as The Cheif, a beautiful mass of rock overlooking the small city. We pulled into the campground where we were quickly greeted by other climbers and highliners, strangers and friends alike. We found a parking spot, filled out the self-service forms and slipped out $10 per night per person fee to a locked box.
 As the international climbing community is so small, we quickly ran into people we'd climbed with locally in Portland and abroad and felt at home. We were living out of our car for the duration of our trip, so we'd fastened makeshift curtains and put in the homemade sleeping platform a friend had built years ago. The roof rack was a great asset: all food must be put in hard-sided containers, whether it be the (overly full) food bins provided in the campsites or a car, and since we wanted to crack the windows at night without fear of bears being attracted to our food-filled car, we stored our food in the locked roof box up top.
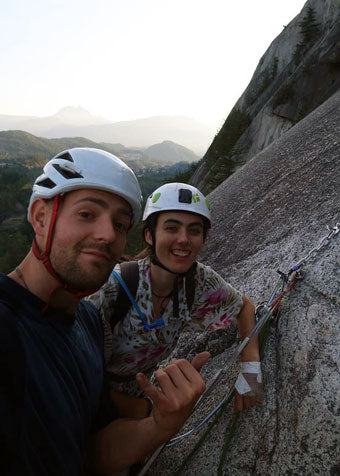
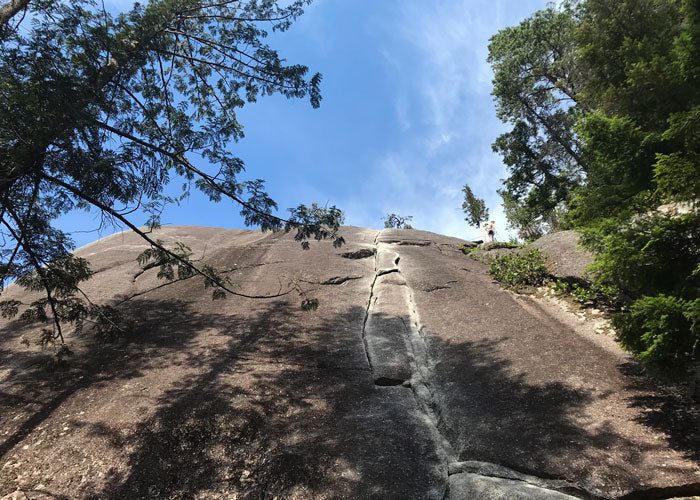
We made a curry dinner with my wee camping stove and MSR Trail Lite Duo cook set, used the campsite's running water for cleaning and drinking and went off to bed. The next day the climbing started. An old-time climbing partner and I jumped onto Slot Machine, a classic trad two pitch 5.8 that many people make their first time in Squamish. By the end of our climb, the sun was brutal, and I seriously regretted not bringing approach shoes as the approach and downclimb were vertical with some fixed ropes for assistance. At the top of Slot Machine, we were greeted by another wall where we jumped on Golden Labs, a single pitch trad route graded 5.9+ and pumpy as can be. We ended the day there, as we'd started late, and it was already getting hot, downclimbed and spent the rest of the day slacklining and checking out the many shops in town.
As the international climbing community is so small, we quickly ran into people we'd climbed with locally in Portland and abroad and felt at home. We were living out of our car for the duration of our trip, so we'd fastened makeshift curtains and put in the homemade sleeping platform a friend had built years ago. The roof rack was a great asset: all food must be put in hard-sided containers, whether it be the (overly full) food bins provided in the campsites or a car, and since we wanted to crack the windows at night without fear of bears being attracted to our food-filled car, we stored our food in the locked roof box up top.
We made a curry dinner with my wee camping stove and MSR Trail Lite Duo cook set, used the campsite's running water for cleaning and drinking and went off to bed. The next day the climbing started. An old-time climbing partner and I jumped onto Slot Machine, a classic trad two pitch 5.8 that many people make their first time in Squamish. By the end of our climb, the sun was brutal, and I seriously regretted not bringing approach shoes as the approach and downclimb were vertical with some fixed ropes for assistance. At the top of Slot Machine, we were greeted by another wall where we jumped on Golden Labs, a single pitch trad route graded 5.9+ and pumpy as can be. We ended the day there, as we'd started late, and it was already getting hot, downclimbed and spent the rest of the day slacklining and checking out the many shops in town.
 The next few days followed a similar pattern except for our last day when we jumped on the well-known Diedre, a 6-pitch trad route that we started, in order to beat the crowds and the sun, at 6 am. We had two groups ahead of us and many after us; this route sees a line of traffic, especially on weekend. Only requiring a single rack up to #2, it was an easy multipitch gear wise, especially as it has bolted anchors. I did the first pitch in my approach shoes (which I wouldn't entirely recommend but was doable) and then we linked some of the crack pitches at the top. This was, admittedly, a very poor choice. Even with a 70m rope, at one point my climbing partner had to create a natural anchor only 5m or so from the bolted one. The rope drag was minimal but unless you're rocking an 80m rope I wouldn't recommend it. We made it to the top my 9am and enjoyed the rest of the day slacklining.
The next morning, we packed up our stuff and headed out, driving down through Vancouver and over the border again. Though some would think a 6 hr. drive one way is a long way to go for a 4/5-day trip, we were happy we did it (besides, I've gone up to Squamish for long weekends often so a 5 day trip was pretty long for me actually). Though planning for this trip was minimal here are some pro tips to make it a little easier:
The next few days followed a similar pattern except for our last day when we jumped on the well-known Diedre, a 6-pitch trad route that we started, in order to beat the crowds and the sun, at 6 am. We had two groups ahead of us and many after us; this route sees a line of traffic, especially on weekend. Only requiring a single rack up to #2, it was an easy multipitch gear wise, especially as it has bolted anchors. I did the first pitch in my approach shoes (which I wouldn't entirely recommend but was doable) and then we linked some of the crack pitches at the top. This was, admittedly, a very poor choice. Even with a 70m rope, at one point my climbing partner had to create a natural anchor only 5m or so from the bolted one. The rope drag was minimal but unless you're rocking an 80m rope I wouldn't recommend it. We made it to the top my 9am and enjoyed the rest of the day slacklining.
The next morning, we packed up our stuff and headed out, driving down through Vancouver and over the border again. Though some would think a 6 hr. drive one way is a long way to go for a 4/5-day trip, we were happy we did it (besides, I've gone up to Squamish for long weekends often so a 5 day trip was pretty long for me actually). Though planning for this trip was minimal here are some pro tips to make it a little easier:
 Camping
-If you camp at Swatamus Cheif like we did make sure to get back before 8pm, that's when the overnight car park fills up
-There are a lot of campsites and some are cheaper than the Cheif, check the BC parks website to see if your many other options
Gear
-Bring approach shoes. Seriously, I was so thankful I did.
-I'd say more than half of the climbers I see/interact with every time I go to Squamish have TC Pros, the best known and most worn trad shoe. I was no exception, I love my TCs, and they are perfect for Squamish. They were designed by legend Tommy Caldwell (hence TC) for Yosemite, which is also granite crack and slab, just like Squamish, so they are awesome for the rock up in BC, If you have a pair or were thinking about trying them on, this was be the perfect trip to bring some. Read Sydnee's review of TC Pros here (https://nextadventure.net/blog/tc-pro-climbing-shoes/)
-You'd probably be fine with a single rack unless you're hell bent on doing only splitter cracks (otherwise doubles in purple/green cams at least)
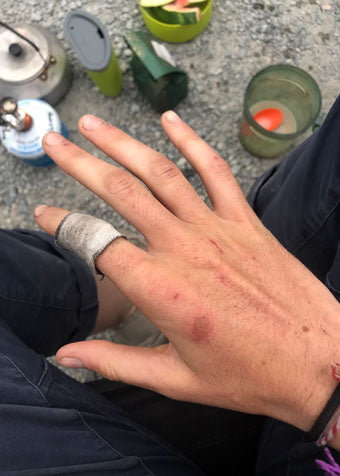
-Bring. Tape. (or crack gloves) I climbed without crack gloves or tape on my hands and I had some serious goobies (wounds from crack climbing) by the end. I also didn't bring hand salve which I definitely regretted. Granite is hard on your hands.
Food
-You generally cannot bring produce, and many other foods, over the border. There are a lot of grocery shops and restaurants in town where you can buy your food. We also brought some backpackers meals which after a long day of climbing we really appreciated since it meant all we had to do was boil water (not cook)
-Don't leave food out, not only will the rangers take it, but it puts you and bears at risk
Camping
-If you camp at Swatamus Cheif like we did make sure to get back before 8pm, that's when the overnight car park fills up
-There are a lot of campsites and some are cheaper than the Cheif, check the BC parks website to see if your many other options
Gear
-Bring approach shoes. Seriously, I was so thankful I did.
-I'd say more than half of the climbers I see/interact with every time I go to Squamish have TC Pros, the best known and most worn trad shoe. I was no exception, I love my TCs, and they are perfect for Squamish. They were designed by legend Tommy Caldwell (hence TC) for Yosemite, which is also granite crack and slab, just like Squamish, so they are awesome for the rock up in BC, If you have a pair or were thinking about trying them on, this was be the perfect trip to bring some. Read Sydnee's review of TC Pros here (https://nextadventure.net/blog/tc-pro-climbing-shoes/)
-You'd probably be fine with a single rack unless you're hell bent on doing only splitter cracks (otherwise doubles in purple/green cams at least)
-Bring. Tape. (or crack gloves) I climbed without crack gloves or tape on my hands and I had some serious goobies (wounds from crack climbing) by the end. I also didn't bring hand salve which I definitely regretted. Granite is hard on your hands.
Food
-You generally cannot bring produce, and many other foods, over the border. There are a lot of grocery shops and restaurants in town where you can buy your food. We also brought some backpackers meals which after a long day of climbing we really appreciated since it meant all we had to do was boil water (not cook)
-Don't leave food out, not only will the rangers take it, but it puts you and bears at risk
The Full Report:
Squamish is a world-renowned destination for climbing, people come from all over the world to witness Swatamus Cheif and scale the many climbing routes up and around it. My partner and I are no different and followed the crowd taking a 6-hour drive up to Squamish to spend five days climbing and highlining while camping at Swatamus Cheif Campground. The drive itself is full of pit stops and beautiful scenery, from views of Puget Sound to the mountains of northern Washington, it feels like a quick 6 hours. The border crossing, which can be done with a passport or a passport card, can take anywhere between 10 minutes and an hour. Account for this delay in your journey. After getting through the border in around 45 mins, we drove through Vancouver, BC, and made our way up to Squamish, 1 hr. from Vancouver and roughly 1 hr. and 45 mins from the border.
Right before reaching Squamish we were greeted by Swatamus Cheif, also referred to as The Cheif, a beautiful mass of rock overlooking the small city. We pulled into the campground where we were quickly greeted by other climbers and highliners, strangers and friends alike. We found a parking spot, filled out the self-service forms and slipped out $10 per night per person fee to a locked box.
As the international climbing community is so small, we quickly ran into people we'd climbed with locally in Portland and abroad and felt at home. We were living out of our car for the duration of our trip, so we'd fastened makeshift curtains and put in the homemade sleeping platform a friend had built years ago. The roof rack was a great asset: all food must be put in hard-sided containers, whether it be the (overly full) food bins provided in the campsites or a car, and since we wanted to crack the windows at night without fear of bears being attracted to our food-filled car, we stored our food in the locked roof box up top.
We made a curry dinner with my wee camping stove and MSR Trail Lite Duo cook set, used the campsite's running water for cleaning and drinking and went off to bed. The next day the climbing started. An old-time climbing partner and I jumped onto Slot Machine, a classic trad two pitch 5.8 that many people make their first time in Squamish. By the end of our climb, the sun was brutal, and I seriously regretted not bringing approach shoes as the approach and downclimb were vertical with some fixed ropes for assistance. At the top of Slot Machine, we were greeted by another wall where we jumped on Golden Labs, a single pitch trad route graded 5.9+ and pumpy as can be. We ended the day there, as we'd started late, and it was already getting hot, downclimbed and spent the rest of the day slacklining and checking out the many shops in town.
The next few days followed a similar pattern except for our last day when we jumped on the well-known Diedre, a 6-pitch trad route that we started, in order to beat the crowds and the sun, at 6 am. We had two groups ahead of us and many after us; this route sees a line of traffic, especially on weekend. Only requiring a single rack up to #2, it was an easy multipitch gear wise, especially as it has bolted anchors. I did the first pitch in my approach shoes (which I wouldn't entirely recommend but was doable) and then we linked some of the crack pitches at the top. This was, admittedly, a very poor choice. Even with a 70m rope, at one point my climbing partner had to create a natural anchor only 5m or so from the bolted one. The rope drag was minimal but unless you're rocking an 80m rope I wouldn't recommend it. We made it to the top my 9am and enjoyed the rest of the day slacklining.
The next morning, we packed up our stuff and headed out, driving down through Vancouver and over the border again. Though some would think a 6 hr. drive one way is a long way to go for a 4/5-day trip, we were happy we did it (besides, I've gone up to Squamish for long weekends often so a 5 day trip was pretty long for me actually). Though planning for this trip was minimal here are some pro tips to make it a little easier:
Camping
-If you camp at Swatamus Cheif like we did make sure to get back before 8pm, that's when the overnight car park fills up
-There are a lot of campsites and some are cheaper than the Cheif, check the BC parks website to see if your many other options
Gear
-Bring approach shoes. Seriously, I was so thankful I did.
-I'd say more than half of the climbers I see/interact with every time I go to Squamish have TC Pros, the best known and most worn trad shoe. I was no exception, I love my TCs, and they are perfect for Squamish. They were designed by legend Tommy Caldwell (hence TC) for Yosemite, which is also granite crack and slab, just like Squamish, so they are awesome for the rock up in BC, If you have a pair or were thinking about trying them on, this was be the perfect trip to bring some. Read Sydnee's review of TC Pros here (https://nextadventure.net/blog/tc-pro-climbing-shoes/)
-You'd probably be fine with a single rack unless you're hell bent on doing only splitter cracks (otherwise doubles in purple/green cams at least)
-Bring. Tape. (or crack gloves) I climbed without crack gloves or tape on my hands and I had some serious goobies (wounds from crack climbing) by the end. I also didn't bring hand salve which I definitely regretted. Granite is hard on your hands.
Food
-You generally cannot bring produce, and many other foods, over the border. There are a lot of grocery shops and restaurants in town where you can buy your food. We also brought some backpackers meals which after a long day of climbing we really appreciated since it meant all we had to do was boil water (not cook)
-Don't leave food out, not only will the rangers take it, but it puts you and bears at risk